Feeds:
Posts
Comments

Archive for the ‘Tools’ Category

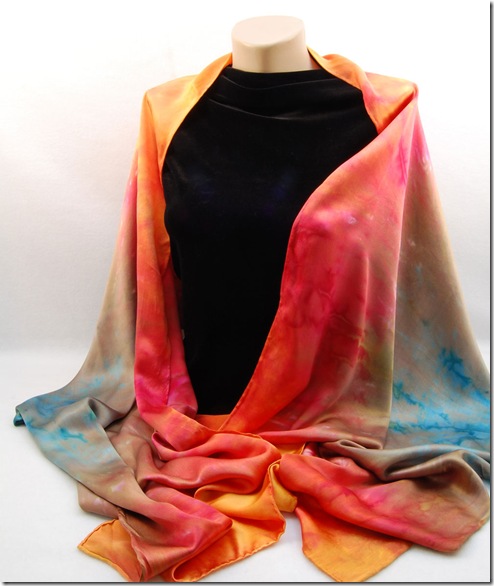
Charmeuse-Crocus-01

I’ve talked about photography here before – and if you’re a blogger (or not!) you know how hard it is to take a good photograph to accurately show people you’re talking to through the computer what exactly you want to show them! But I really wanted to get more of my scarves up in my Etsy shop, so I’ve been plugging away at how to photograph them!

Back in June I did a guest post on Simply Robin’s Blog about my very simple light box I rigged up to take photos of my Going Green Journals. Well, I needed something larger for my scarves, so my hubby had time to rig up something for my from PVC (Bill Huber has a nice tutorial here, we did something quite similar). So here’s my setup (note: the good camera is in the shot, so this is my cell phone!)

It’s a frame made from PVC. Draped down the back, across the table and then down the table front is a large piece of white polyester fleece for a smooth, white backdrop.  A piece of white, quit weight white fabric is draped up the sides and over the top, this diffuses the light. I’ve got 4 clamp on lights – 2 are huge, “trumpet top” CFLs. I learned about them here: (this is a GREAT resource about photographing quilts!) I needed more light so I added 2 more regular CFL’s, 2 more of the trumpet tops are on their way to me as we speak! This creates a white glowing box with very little shadow.

I then turned off the flash, set my white balance and started clicking. I still had to tweak a little in Photoshop, but much less than I had before. Mostly I just played with the levels to get the whites whiter. Kathy Mack has some awesome tips about tweaking digital photos on her blog, this is the one that talks about levels, but they all are worth a read, and written by a sewist, not a photographer, in language we quilters can understand!!!!!

Now that I’m happy with my picture taking process, I can start doing a better job of trying to sell my scarves online. One issue there is that I sell so many scarves locally, I would sell a scarf listed in Etsy. BUT I’ve now changed my listing to read:

Each scarf is uniquely hand-dyed, using a specific set of mixed colors. Description of the particular palette here.  Although I may have one in stock, I also may need to dye one just for you, so it may take as long as 7 days for me to ship it. Patterns & distribution of colors varies from scarf to scarf, convo me if you’d like a picture of your exact scarf or the exact timing on your own piece of “Candied Fabric”.

I’ve also started creating palette shots (inspired by Vickie Welsh and Daisy Janie) to help me describe the colors in the scarves.

Daffodil-Sky-Pallette

Daffodil Sky is a combination of a yellow-gold, 2 shades of blue and teeny bits of a leafy green.

Charmeuse-Daffodil-Sky-11Wild-Rice-PalletteWild Rice is a delicate mix of gray, tan, light pink with a hint of gold.Charmeuse-Wild-Rice-03 Earth-Wind-Fire-Pallette Earth, Wind & Fire combines an earthy brown, with an ethereal blue and a vibrant red & gold.

Charmeuse-Stole-Earth-Wind-Fire-07

So, what do you think? Is this a good way for me to showcase my scarves online?

Read Full Post »

Hi there! I’m blogging about taking photos over at Simply Robin today. I took some new photos of my new Journal covers (STILL need a name!) this morning and posted my adventures over at Robin’s. Here is the “money shot” – I LOVE this one…

Closer Planner_0020 copy I’m now off to sew 30 of these babies by…Saturday! Yikes!!!!

Read Full Post »

Overwhelmed

Yes, it’s true, I like to be busy. I like to do things. I like to make things. I have lots in my head that I can’t wait to see in the real world. Sometimes, it’s all a bit too much.

I’m officially in a loop. I’m stuck, and feeling very overwhelmed. In fact, I’ve just placed Jose Gonzalez “Heartbeats” ON a loop on iTunes, hoping the peacefulness will help.I’m sure some of this is hormones. Some of this is accumulated crap from a busy year at work. Some of this is the stress and exhaustion oozing from my husband: we’ve had some layoffs at the University that have again created more work for him. HE needs a vacation, and instead he has MORE work to do this summer.

Add to this the fact I’ve just purchased Adobe CS4 design premium to get me up to speed for setting up my awesome (in my mind) website. Until this time, all my photo prep has been done in a REALLY OLD version of Photoshop elements, my layout work in either MSWord or MSPublisher, my vector drawing in EQ6, and my last web-coding was done 7 years ago in MS Frontpage. My friends, the world has changed.

I know that a lot of readers of this will be scratching their heads and saying “man, she is BEHIND the times” or “okay, she’s making do with what she has”. OTHER readers will be saying “??? who knew there were all those different programs???” 😉

I am a computer geek, who’s had less and less time to spend understanding what she uses, but now there’s a wall in front of me that I have to break through. I need to understand how this new set of programs works – and that’s confounding me, because I have all this art I want to make, I have some house reorganizing to do, oh and a family to pay attention to…

So, I’m spinning my wheels. I don’t have a plan on how to fix this, except maybe try to have a conversation with my hubby about how I prioritize this next month – he’s very helpful, when I can correctly verbalize where my stuckness is…perhaps I’ll just ask him to read this post!

Here’s a stab at me playing with photoshop:

I live in S. CA, and this beautiful rose garden came with our house. We’ve had an amazingly cool May/June so far, and they are doing fantastically


Roses Garden copy

I have an awesome DSLR, a Nikon D40, which I am still just beginning to learn to use. Today I decided to use the Macro setting:

Roses_0022

Here’s what happens JUST when I use “Autotone” in Photoshop:

Roses_0022 holy crap copy

HOLY CRAP! Is this a stupendous picture, or am I hallucinating?

Any old who, here are a bunch more pix, that I was randomly trying out all sorts of little tweaks on. But after I discovered the autotone feature, I couldn’t, in my blind stumbling, do any better than that.Roses_0001 Roses_0005 copy Roses_0010 copy Roses_0020 copy   Roses_0031 copy Roses_0033 copy Roses_0036 Miles to go…

Read Full Post »

Juki TL-98 Q Meme

Sew Mama Sew is having Sewing Machine Month! What fun, a whole month full on useful info about sewing machines! Anyway, as part of this month, they’ve asked for folks to review their machines on their blogs. Since I LOVE both my sewing machines, I thought I’d join in the fun! So, without further ado, here’s the info on Sewing Machine # 2, a Juki TL-98 Q!

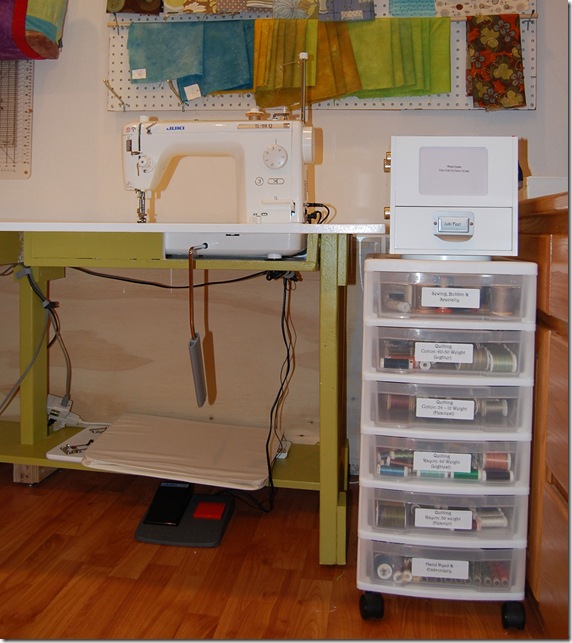
ca-studio-068

Juki tl-98Q, along with feet and thread storage

What brand and model do you have?

  • Juki TL-98 Q!

How long have you had it?

  • 11 months

How much does that machine cost (approximately)?

  • I’ve seen it on the internet for ~$850. I bought it from my local dealer for $1000 or so. They let me spend a whole hour making a trial totebag on it, and answered all my questions in detail. Love the service, and they’ve got a great technician, so it was totally worth it to pay the higher price!

What types of things do you sew (i.e. quilting, clothing, handbags, home dec projects, etc.)?

  • Quilting, home dec, bags

How much do you sew? How much wear and tear does the machine get?

  • 2-20 hours a week, probably averages out to 4/5 hours each week…? Maybe more?

Do you like/love/hate your machine? Are you ambivalent? Passionate? Does she have a name?

  • Love it!  No, it’s just “My Juki”

What features does your machine have that work well for you?

  • GREAT stitch quality, great SPEED, tremendous power – I’m making lots of bags from canvas and layers of interfacing and quilt batting, this machine pays no attention to it!

Is there anything that drives you nuts about your machine?

  • I wish the feet were easier to change – you have to unscrew each one, and I switch feet multiple times/bag.

Do you have a great story to share about your machine (i.e., Found it under the Christmas tree? Dropped it on the kitchen floor? Sewed your fingernail to your zipper?, Got it from your Great Grandma?, etc.!)? We want to hear it!

  • Last June I finally had a few minutes to myself during regular business hours and I took an example of a handle I was topstitching down to my local shop to ask for advice on how to get the underside to look as nice as the top side. While I was chatting with the ladies about needle size and bobbin thread, their technician came out and joined the discussion. Gunter (not his real name, but he talks and looks like a Gunter…) said to me: “You, you have a Mercedes. But you would not move rocks with a Mercedes”. He was telling me that to use a Bernina to sew through all those layers for bag after bag after bag, I was going to wear it out faster! AAAHHH! I’d never considered that! So, I quickly came to the realization that the Juki was the way to go! Funny thing is, I’d wanted a machine like this for years, mostly for the increased room under the arm…but since I COULD quilt my quilts with my Bernina, I didn’t NEED to have that extra room. But hearing I was wearing out my “Mercedes” machine – eekks! Just the incentive I needed. And, with my little business becoming profitable, I could actually (just) afford to buy the machine with the money I’d made sewing! Voila – justification complete!

Would you recommend the machine to others? Why?

  • Yes. Great stitch quality, very sturdy construction, knee lift, needle up/down, thread cutter, incredible speed (1600 spm).

What factors do you think are important to consider when looking for a new machine?

  • Knee lift, needle up/down, speed (spm)

Do you have a dream machine?

  • ?? Along with my Bernina (see this post), I’ve got all my bases covered! Maybe if I had a huge studio and lots more money, I’d look into one of the mid-size machines that mount in a table with the body to the back so there’s room for hand controlled free motion quilting on both sides of the head. But it would be an addition to the 2 I love now!
ca-studio-071

My 2 machines in the table my husband & I built for them

Tutorial for sewing machine table here.

Read Full Post »

Bernina 1530 Meme

Sew Mama Sew is having Sewing Machine Month! What fun, a whole month full on useful info about sewing machines! Anyway, as part of this month, they’ve asked for folks to review their machines on their blogs. Since I LOVE both my sewing machines, I thought I’d join in the fun! So, without further ado, here’s the info on Sewing Machine # 1, a Bernina 1530!

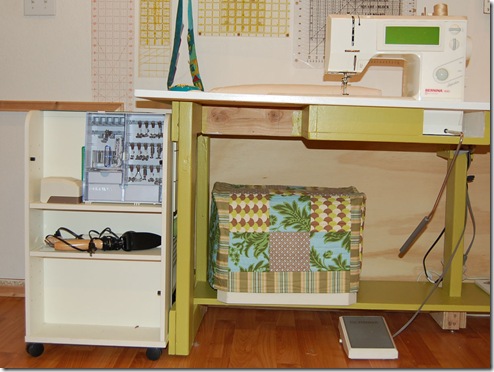
ca-studio-069

My Bernina 1530 with the neat feet storage container.

What brand and model do you have?

  • A Bernina 1530

How long have you had it?

  • 10 years, but I got it used

How much does that machine cost (approximately)?

  • It was $1200 used when I bought it (but I got a $400 trade in!) I’m pretty sure it was ~ 1500-1800$ new. Edit: Amanda just commented that hers was $3500 brand new – Holy Moley I got a GREAT deal!

What types of things do you sew (i.e. quilting, clothing, handbags, home dec projects, etc.)?

  • Quilting, home dec, bags

How much do you sew? How much wear and tear does the machine get?

  • 2-20 hours a week, probably averages out to 4/5 hours each week…? But now that I’ve got my Juki as well, she gets to rest on her laurels a lot!

Do you like/love/hate your machine? Are you ambivalent? Passionate? Does she have a name?

  • Love it!  No, it’s just “My Bernina”

What features does your machine have that work well for you?

  • GREAT stitch quality, love the easily switched feet.

Is there anything that drives you nuts about your machine?

  • Wish there were more room under the arm for large quilts.

Do you have a great story to share about your machine (i.e., Found it under the Christmas tree? Dropped it on the kitchen floor? Sewed your fingernail to your zipper?, Got it from your Great Grandma?, etc.!)? We want to hear it!

  • I had a real entry level Bernina that was giving me fits with tension adjustment. I took it to the dealer 90 minutes away to get fixed, and went shopping for a couple of hours. When we came back and were waiting for the final bill, I of course was oohing and aahing at all the new Berninas, and noticing that there were some very nice used Berninas at very nice prices (Bernina had come out with a completely new line of machines that year, so they were getting lots of trade-ins). The repair was going to be price (?$200 or so), and dear hubby could see how much better all these other machines were, so we ended up trading the injured machine for my 1530! A getting in trade just about what we had paid for it a couple of years previously! WooHoo! This was QUITE a lot of money for us back then…and the amazing thing was that it was such a spur of the moment thing. usually when we’re going to buy a big ticket item we do all sorts of research and price comparing.

Would you recommend the machine to others? Why?

  • Yes. Great stitch quality, very sturdy construction, I love the trackball instead of a lot of little buttons, knee lift, needle up/down, speed control.

What factors do you think are important to consider when looking for a new machine?

  • Knee lift, needle up/down, speed (spm)

Do you have a dream machine?

  • ?? Along with my Juki (see this post), I’ve got all my bases covered! Maybe if I had a huge studio and lots more money, I’d look into one of the mid-size machines that mount in a table with the body to the back so there’s room for hand controlled free motion quilting on both sides of the head. But it would be an addition to the 2 I love now!
ca-studio-071

My 2 machines in the table my husband & I built for them

Tutorial for sewing machine table here.

Read Full Post »

So, the upside of my little business is that I have made enough money to completely cover all my material expenses, plus I’ve been able to purchase a new camera (a Nikon D40) and a new Sewing Machine – a Juki TL-98Q. Yay! But now I needed a table that could fit both machines at once, or one at a time. For 2 reasons, 1) money and 2) function, my DH has made me the perfect sewing machine table!

Tah Dah! As always – click any picture to embiggen!

It is 2' x 6', with an extension hinged across the back to make it a full 4' deep when I want (the extensions that hold that up aren't built yet, but Rome wasn't built in a day either...) It is 28" high with leveling feet that allow up to another 1" in height if needed. There is also a 12" deep shelf running across the back to hold either the machine covers or the machines themselves.

2x4's braced with plywood pieces at the junctions. There is a 12" deep shelf running across the back.

Table frame: 2x4's braced with plywood pieces at the junctions. There is a 12" deep shelf running across the back.

Measuring

Measuring

Holes Cut

Holes Cut

Shelf

Shelf

Lots of drywall screws, counter sunk, then later filled with spackle.

Lots of drywall screws, counter sunk, then later filled with spackle.

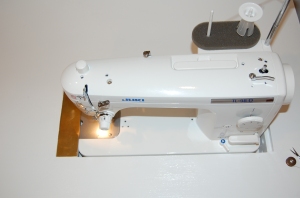
The Juki with the brass plate set into the worktop and held in place with some rare earth magnets. I can fit my finger into the fingerhole of the plate on the machine, flip the brass plate over, then access the bobbin area.

The Juki with the brass plate set into the worktop and held in place with some rare earth magnets. I can fit my finger into the fingerhole of the plate on the machine, flip the brass plate over, then access the bobbin area.

Here the brass plate is flipped over - you can see the magnets coutner sunk and plenty of room to access the bobbin.

Here the brass plate is flipped over - you can see the magnets counter sunk and plenty of room to access the bobbin.

Bernina

Bernina sits just proud of the table and the table that came with it covers up the hole. This system worked really well with my old table and saves the $$ for the plexiglass insert. See my July 6 post.

We stapled some velcro ties underneath to control the cords.

We stapled some velcro ties underneath to control the cords.

My DH created a "mini-table" insert for the Bernina hole.
My DH created a “mini-table” insert for the Bernina hole.
A crefully fit plywood top with 2x4 bits underneath. Those are adjustable chair legs crewed into the bottom, so we could get the  top totally flush.

A carefully fit plywood top with 2x4 bits underneath. Those are adjustable chair legs screwed into the bottom, so we could get the top totally flush.

With the "mini-table" in place, I can use the surface for cutting, or it will support a large quilt when I'm quilting.

With the "mini-table" in place, I can use the surface for cutting, or it will support a large quilt when I'm quilting.

Even more pictures of this whole process are here…if you need to show the handy person in the house “Just how Candy’s husband did it” so they too can build you the perfect sewing table!
With the addition of one more set of drawers for my fused fabric little bits my studio works very well!

With the addition of one more set of drawers for my fused fabric little bits my studio works very well!

This new table is a bit narrower, so when I open up the cutting table all the way, there's room to walk all the way around.

This new table is a bit narrower, so when I open up the cutting table all the way, there's room to walk all the way around.

These drawers were repurposed to hold all my thread.

These drawers were repurposed to hold all my thread.

I can also create an ironing surface by placing my large board across a small set of rolling shelves (balance carefully) Then I can cut & press side by side.

I can also create an ironing surface by placing my large board across a small set of rolling shelves (balance carefully) Then I can cut & press side by side.

I always enjoy seeing where people work, so I’m glad that 1) I’ve got such a great place to work and 2) that I can show it off to you! This is not a large room, but with most things on wheels, I can reconfigure it depending on how I need the space! This is working really well for me.

Read Full Post »

My Studio Today

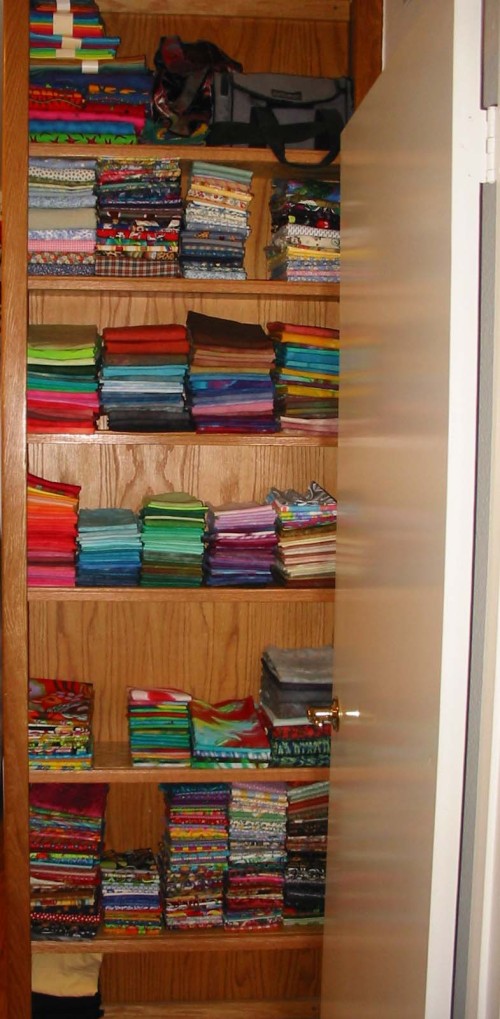
So, here is my studio today. When you enter the door, the 1st thing you see is shelves of folded fabric – YUM! Luckily, these shelves were built in to this space, all I had to do was fold the fabric to fit correctly – now that was fun 😉

Anyway, as you continue on through, there’s a closet on the right:

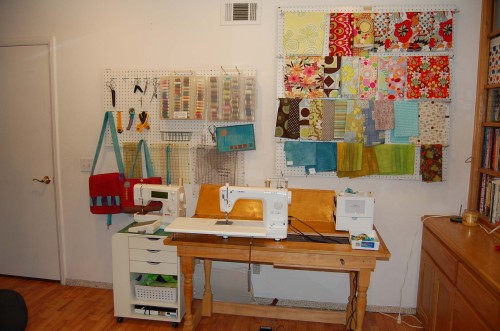
And then there’s my working wall, with a cut & press station made by hubby. The large pressing board can be removed, and another leaf can fold up out of the back. Note: I don’t often watch TV while working – it’s too distracting and I like to keep an ear on my kids. BUT, it makes the perfect place to plug in an iron…I love have the cord coming down from  on high!

Here’s my desk, this was built in by the previous owners!

Finally, here is my current sewing table:

But now it has company! Hubby is building a new one to take both machines. The Bernina is sitting on a lovely litte cart I got from the scratch & dent at Ikea, it’s

got lots of d

rawers 7 shelves to hold all the bits and pieces for my Bernina, and as it has well, can roll around and sit on my left as I’m sitting.

As you can see, I’ve got some peg board mounted – great at holding tools and boxes of thread. I’ve also mounted some dowels with fun commercial fabric I’ve purchased and want to oogle. I don’t usually work with commercial fabric, except for home decorating, but I still love it, so I buy small bits of it and use it for inspiration!

Hope you enjoyed the tour!


Read Full Post »

So, my DH is buidling me a new sewing machine table. I thought I’d recap my older ones and then provide a tutorial of sorts on how he built the new one. This post I’ll give a tour of the studio I had set up in a bedroom back when we lived in a 1930’s cape in newark, OH. Even though things were a bit awkward because of sloped ceilings, I loved this room. I’ve posted pix of this space in a gallery format below, click on each picture for a detailed description.

When we moved to CA 4 years ago, I again had a bedroom to call my own, but it was much smaller, so we’ve had to make new furniture for sewing & cutting. Luckily the bedroom came with a built-in desk with lots of bookshelves, so I had some great storage right from the get go. But that’s for another post!

Read Full Post »